Home > Blog > Drinking Fountains >
Installing an Outdoor Drinking Fountain: Step-by-Step
2025-10-06
Thinking about adding an outdoor drinking fountain to your park, school campus, or public space? You’re making a smart choice for accessibility and hydration. This guide walks you through the process, from planning to upkeep, ensuring your setup is safe, efficient, and long-lasting. We’ll cover everything in straightforward steps, focusing on what matters most to you as a facility manager or installer.
Product Specifications and Standards
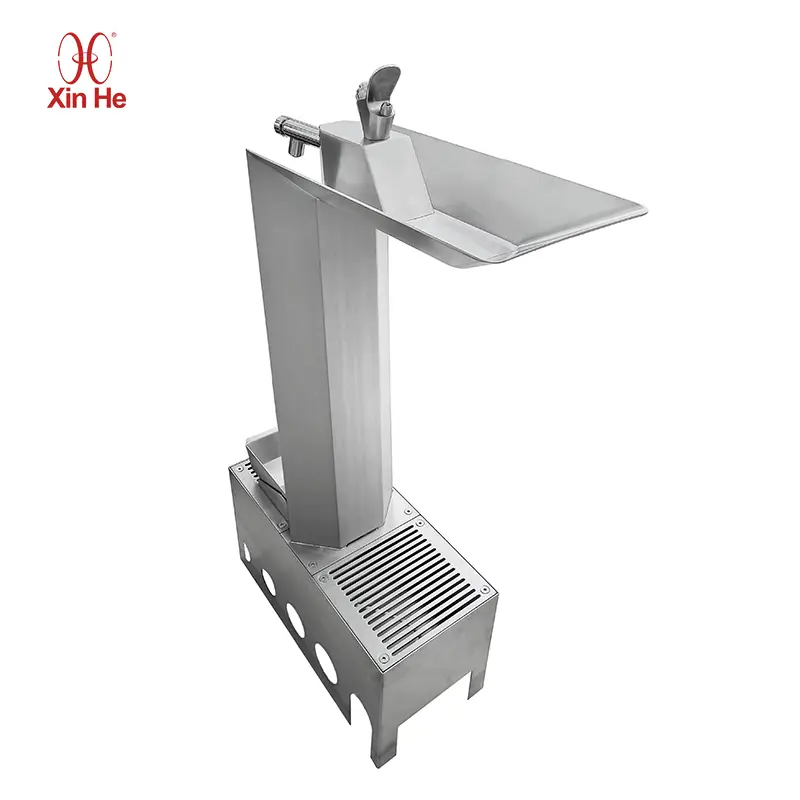
Let’s start with the basics—what makes a reliable outdoor drinking fountain tick? These units, often built as free-standing drinking fountains with bottle fillers or including a pet drinking bowl, need to stand up to weather, heavy use, and safety standards. Focus on materials like 316 stainless steel, which offers better corrosion resistance than 304 stainless steel, especially in salty or chlorinated environments. Research shows 316’s added molybdenum helps it resist pitting and crevice corrosion, making it ideal for outdoor water fountains exposed to the elements.
Key specs to look for include:
- Dimensions: Typical base is 24×24 inches, with heights varying for dual-level access—around 36 inches for lower spouts and 38-43 inches for upper ones.
- Water Flow: Aim for 30-50 PSI inlet pressure to deliver a steady stream without splashing, often with laminar flow for easy drinking.
- Drainage: 50-mm pipes sloped at 1/4 inch per foot to prevent pooling.
Certifications are crucial for peace of mind. NSF/ANSI 61 ensures materials in contact with drinking water don’t leach harmful contaminants, protecting public health. cUPC certification confirms compliance with North American plumbing codes for safety and performance. If you’re in Australia or exporting there, WaterMark certification verifies the unit meets standards for potable water systems. These aren’t just badges—they mean your outdoor fountains or wall water fountains have been tested for durability and hygiene.
For accessibility, follow ADA guidelines: Spout outlets for wheelchair users max out at 36 inches high, with clear knee space of 27 inches high and 17-25 inches deep. Standing users need spouts between 38-43 inches. This setup works for everyone, from kids at school water fountains to adults refilling bottles at a water fountain with bottle filler.
Pre-Installation Preparation
Before digging in, take a moment to plan. As someone managing a public space, you want an outdoor drinking fountain that’s easy to reach, safe, and cost-effective over time. Start by picking a spot: High-traffic but not too close to dirt sources like sports fields to avoid contamination. Ensure partial shade to keep surfaces cool, and check for good drainage so water flows away naturally.
Call your local utility service 48 hours ahead to mark lines—safety first. Consider the frost line in your area; in colder spots, foundations go 36-48 inches deep to avoid heave. For soil types, sandy needs an 18-inch base, clay 24 inches, with reinforcements like rebar grids.
Gather tools and materials thoughtfully:
- Leveling: 4-foot level or laser for precision.
- Plumbing: Pipe wrenches, cutters, Teflon tape.
- Safety gear: Gloves, glasses, knee pads.
- Supplies: 1/2-inch BSP water line, 50-mm drain pipe, concrete (C25 strength minimum), gravel for drainage.
Personnel-wise, involve qualified folks. Installations with any electrical components, like heated lines for pet water dispensers, require licensed electricians. This isn’t DIY territory—professional handling keeps things compliant and avoids headaches.
Safety warnings up front: Always cut power before working near water. Use GFCI-protected outlets for any electrical parts to prevent shocks, per NEC standards. Ground all metal parts with 8 AWG copper wire for bonding. If your unit has lights or heaters, waterproof cables with triple insulation are a must.
Detailed Installation Steps
Now, let’s get hands-on. Installing an outdoor wall fountain or free-standing model follows similar logic, but always check your unit’s manual for tweaks. We’ll break it down step by step, like chatting through a project together.
Step 1: Foundation and Base Setup
A solid base prevents shifting—think of it as the roots for your large outdoor water fountains. Excavate to your frost line depth, say 24 inches for loam soil. Build a form with 2x lumber, square it by diagonal measurements.
Add a gravel layer for drainage, then a vapor barrier to block moisture. Pour concrete (4-inch slump for workability), vibrate to remove air pockets, and cure for 48-72 hours. This ensures stability for heavy-use spots like parks with drinking water fountains.
Step 2: Positioning the Underground Box
This box protects plumbing and mounts securely. Center it level with grade—no trips or debris traps. Align ports for supply and drain lines. Dry-fit connections before concrete sets around it.
Step 3: Mounting the Main Unit
Lift carefully (85-120 pounds)—use help or equipment. Secure with 304 stainless steel bolts at 18-20 ft-lbs torque. Padding prevents scratches on your stainless steel water dispenser.
Step 4: Plumbing Connections
Connect the 1/2-inch line with sealant, test for leaks at 30-50 PSI. Slope drains properly. In cold areas, add heat tape to lines.
Step 5: Adding Accessories
For a pet drinking fountain option, snap the bowl in—its tilt design aids cleaning. Ensure shared filtration for quality water in the dog water dispenser.
Step 6: Final Assembly
Install grating with tamper-resistant screws. Test flow, stability, and cleanliness.
Throughout, use diagrams (imagine a simple sketch here: base with rebar, box centered, unit mounted).
Testing and Acceptance
Once assembled, verify everything works. Use a checklist:
- Steady flow from all outlets.
- No leaks.
- Stable base—no wobble.
- Accessible heights per ADA.
Run water for 5-10 minutes to flush lines. If it’s a water dispenser for office outdoor areas or schools, log initial pressures and flows for baselines.
Maintenance and Troubleshooting
Keeping your outdoor fountain in top shape saves money long-term. Distinguish daily wipes (anyone can do) from pro checks (licensed techs).
Maintenance Schedule
Here’s a practical table based on usage:
| Task | Daily (High-Use) | Weekly (Medium) | Monthly (Low) | Quarterly | Annually |
|---|---|---|---|---|---|
| Wipe surfaces | Yes | Yes | Yes | – | – |
| Check water levels | Yes | Yes | – | – | – |
| Clean filters/screens | – | Yes | Yes | – | – |
| Flush system | – | – | Yes | Yes | – |
| Inspect connections | – | – | – | Yes | Yes |
| Professional service | – | – | – | – | Yes |
For deep cleans, use mild soap, rinse well, dry to avoid spots—especially on wall fountain outdoor units with mineral buildup.
Winterization in cold climates: Shut off supply, drain all water, blow lines with air, cover with breathable material. This protects ice maker and water dispenser components from cracks.
Troubleshooting table:
| Issue | Possible Cause | Fix |
|---|---|---|
| Low pressure | Clogged screen | Clean inlet |
| Leaks | Loose fittings | Tighten, replace seals |
| No drainage | Blocked pipe | Clear, check slope |
| Freezing damage | Improper winter prep | Drain fully, use heat tape |
For electrical issues in fountain drink setups, call a pro—don’t risk it.
As you maintain your drinking fountains, remember: Regular care extends life, cuts costs, and keeps users happy. Whether it’s a simple bubbler or full pet water dispenser, staying on top means fewer surprises.
In wrapping up, a well-set outdoor drinking fountain enhances any space, promoting health and sustainability. For specs or support, check xinhe website— they’ve got resources tailored for your needs.