Jail Toilet Plumbing Rough-In Guide: Dimensions Every Contractor Needs
When a detention facility project hits the rough-in phase, the margin for error shrinks to almost nothing. A residential plumber can finesse a slightly off-center floor flange with a flexible connector. On a secure facility job site, that option disappears. A jail toilet bolts through reinforced concrete, seats against a cast-in wall sleeve, and must hold up against deliberate abuse for 30 years. Get the rough-in wrong and you are not caulking around a base plate. You are cutting into cured concrete.
This guide serves the mechanical contractor or lead foreman who has the submittal drawings in hand and needs to translate them into a correctly executed rough-in. The dimensions here reflect industry-standard practice for rear-outlet stainless steel correctional fixtures, covering both standalone units and integrated sink-toilet combinations.
Understanding Correctional Rough-In: How It Differs From Commercial Work
Most plumbers spend their careers working with floor-outlet toilets on a standard 12-inch rough-in offset. Correctional work inverts almost every assumption built from that experience.
Standard vs. Rear-Outlet Installation
A conventional commercial toilet sits over a floor flange. Waste exits straight down, and the plumber makes the connection at floor level. A jail toilet discharges through the wall behind it. All water supply lines, waste connections, and flush valve components live in the plumbing chase on the other side of the wall, kept out of reach, out of sight, and out of harm’s way.
That design choice serves more than anti-tamper security. It also concentrates all maintenance activity in the chase corridor, so a plumber can service a fixture without entering the occupied cell. On a 200-cell housing unit, that distinction becomes enormously practical.
Why Tolerances Are Tighter Here
A rear-outlet correctional fixture connects to the waste pipe through a neoprene or EPDM gasket compressed between the fixture’s outlet spud and the wall sleeve. That gasket needs even, full-circumference compression to seal. If the waste pipe center sits 3/4 inch off vertical, the gasket seats at an angle. You won’t see the leak during pressure testing. You will see it six months into occupancy, tracking down a sewer gas complaint through a fully operational cell block.
Manufacturers like Xinhe engineer these fixtures to ASME A112.19.3 tolerances, the governing standard for stainless steel plumbing fixtures, holding dimensional accuracy to approximately ±1/8 inch at the factory level. The rough-in needs to match that precision.
Critical Rough-In Parameters for a Jail Cell Toilet
Four measurements control whether a rear-outlet jail toilet installs cleanly or creates problems.
Wall Opening Dimensions
The wall opening houses the wall sleeve, which the crew typically casts in place during the concrete pour or core-drills into CMU block before installation. The sleeve accepts the fixture’s outlet spud and, in most designs, a separate penetration for the water supply.
Waste outlet opening: Plan for a 6-inch diameter rough opening to accommodate the 4-inch schedule 40 waste pipe plus the sleeve flange. Some manufacturers specify a 4-inch clear opening when the sleeve has a built-in bell, so always confirm against the submittal.
Water supply penetration: This is typically a 1-inch diameter opening positioned directly on the vertical centerline of the fixture, 12 to 15 inches above the waste outlet centerline. Flush valve type determines exact height. A diaphragm-style flush valve has a different inlet height than a piston-style. Do not guess; pull the dimension from the fixture’s rough-in drawing.
Mounting stud penetrations: Four to six 1/2-inch diameter holes, laid out per the bolt pattern in the submittal. These carry the threaded rods that compress the fixture against the wall face. The pattern is not always symmetrical, so a drilling template from the manufacturer gives the safest result.
Waste Outlet Height
For a floor-mounted rear-outlet jail toilet, the center of the waste outlet typically falls 4-1/8 to 5-1/4 inches above finished floor. The variation depends on the fixture’s internal trap configuration and whether the unit meets ADA rim height requirements (17 to 19 inches to top of seat).
Mark this dimension on the wall before the concrete pour if you are in new construction. In a retrofit, this is the measurement you are trying to match to whatever comes out of the wall.
Water Supply Inlet Height
Measured from finished floor to centerline of the supply inlet, standard non-ADA fixtures typically land at 14-1/2 to 15-1/2 inches. ADA-height fixtures add approximately 2 inches to that figure. The rough-in drawing is the authority here; do not interpolate between models.
Wall Thickness and Rod Length
This detail trips up contractors on their first correctional job. Standard mounting hardware fits an 8-inch concrete wall. If the structural drawings call for 10-inch or 12-inch walls, common in maximum-security construction, the threaded rods supplied with the fixture may be too short to engage the chase-side hardware.
Specify wall thickness to the manufacturer during the procurement phase. Most suppliers will provide extended rod packages at no additional cost if you ask before the order ships. Discovering the mismatch on installation day means a fabrication delay.
Back-to-Back Installation and Plumbing Chase Design
Placing two cells on opposite sides of a shared wall is standard practice in modern pod-style housing unit design. It cuts construction cost and simplifies the plumbing layout. It also creates a concentrated set of rough-in challenges.
Minimum Chase Width
Architects favor narrow chases to maximize net cell area. Mechanical contractors have a different priority. A chase narrow enough that a plumber cannot get both hands on a back-nut will generate callback work.
The practical minimum for a back-to-back jail toilet installation is 18 inches clear width, measured between the finished faces of both walls. That gives a medium-build plumber enough room to use a basin wrench on the mounting hardware. For a back-to-back toilet/sink combo installation, 24 inches is more workable.
Building inspectors will not cite you for an 18-inch chase, but the maintenance supervisor will thank you if you push for 22 inches during the coordination meeting. Frame that conversation around long-term facility operating cost rather than installation convenience.
Two toilets draining through the same wall into a shared 4-inch stack require careful vertical staggering. If both waste outlets sit at the same height, you are joining two 4-inch laterals at the same elevation into a single stack. That junction works hydraulically, but the fitting takes up significant horizontal space in a narrow chase.
The cleaner approach: offset one fixture’s waste outlet 6 inches vertically from the other. One cell’s rough-in sits at 4-1/2 inches AFF; the opposing cell sits at approximately 10-11 inches AFF (factoring in the fitting’s body). This gives you a true wye connection on the stack with enough clearance to make the joint properly.
Some contractors use a double-sanitary tee at this junction. That fitting works in this application, but a wye-and-eighth-bend combination provides better flow characteristics in a high-use correctional environment.
Wall Sleeve Alignment in Poured Concrete
For new construction, the safest method uses a purpose-made sleeve template that pins both sleeves simultaneously, mirroring the bolt pattern and outlet position from both sides of the wall. Template systems ensure that the two sleeves are coplanar, meaning both outlets sit at exactly the same height and the horizontal centerlines align. A misalignment of even 1/4 inch between opposing sleeves creates a binding condition when you try to install the second fixture.
Rough-In Requirements: Solo Toilet vs. Sink-Toilet Combo
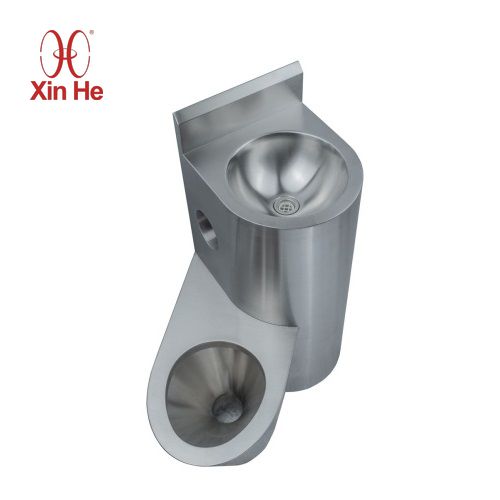
Specifying a combination sink-toilet unit rather than two separate fixtures changes the rough-in meaningfully. Integrated units consolidate waste and supply connections into a single wall penetration pattern, which simplifies the chase layout but demands tighter coordination at the submittal stage.
Coordinating Two Outlet Points
A combo unit requires one waste connection for the toilet trap-way and a separate drain for the sink bowl, typically a 2-inch line entering the chase 20 to 24 inches above the toilet waste centerline. Some current designs route the sink drain internally into the toilet’s trap-way, eliminating the second wall penetration. Confirm this detail with the manufacturer before rough-in begins.
Water supply requirements double: one 5/8-inch or 3/4-inch line for the flush valve, and a separate 3/8-inch supply for the sink’s push-button or sensor-activated valve. Both supply penetrations must fall on or very near the fixture’s vertical centerline to allow the supply tubes to seat straight.
Fixture Centerline and Mounting Height
Because a combo unit is taller than a standalone toilet, the fixture occupies more vertical real estate on the wall. This affects conduit routing, lighting placement, and critically the height of the upper mounting studs. Confirm that the upper bolt pattern does not conflict with the bottom of any conduit sleeve or ceiling ledge built into the wall.
Retrofitting Existing Facilities
Replacing older ceramic fixtures with stainless steel combinations is one of the most common upgrade paths in aging detention facilities. The rough-in almost never matches. Ceramic wall-hung units used a floor-outlet or a different outlet height entirely.
Rather than fabricating offset connectors, which add failure points to a plumbing system that needs extreme reliability, source the replacement fixture with custom outlet positioning. Most stainless steel correctional fixture manufacturers can shift the waste outlet height by 2 to 3 inches from their standard to match an existing wall penetration. The additional lead time is typically two weeks. That outcome beats a field-fabricated offset fitting that a maintenance plumber has to work around for the next 25 years.
A Note on Material Specification
The rough-in dimensions are only as useful as the fixture quality that seats against them. Stainless steel correctional toilets built to ASME A112.19.3 from 14-gauge 304 stainless provide the corrosion resistance and structural rigidity that high-security environments require. The gauge matters. An 18-gauge toilet will deflect measurably under sustained load, which over time compromises the gasket compression at the wall outlet.
When reviewing submittals, check that the outlet spud is a continuous welded component, not a threaded insert. Someone with enough determination and time can back out a threaded insert. A continuously welded spud cannot be removed.
FAQs
What is the standard rough-in height for a jail toilet waste outlet? For a floor-mounted rear-outlet unit, the waste outlet centerline typically sits 4-1/8 to 5-1/4 inches above finished floor. ADA-compliant units may position the outlet slightly higher to achieve the required rim height. Always verify against the specific model’s rough-in drawing.
Can a standard 12-inch floor-offset rough-in be used in a correctional facility? Floor-outlet configurations exist in correctional applications but are rare in higher-security classifications. Designers strongly prefer rear-outlet designs because they move all plumbing out of the cell, simplify maintenance access, and eliminate the floor flange as a potential tamper point.
How do I prevent gasket failure at the wall outlet? Uniform bolt torque across all mounting studs is the key. Torquing in a star pattern, rather than sequentially around the fixture, distributes clamping force evenly and ensures the gasket compresses without distortion. Follow the manufacturer’s torque specification; over-tightening a stainless fixture against a concrete wall can crack the outlet spud weld.
What wall sleeve material should I specify? Contractors use both cast iron and stainless steel. In corrosive environments (high humidity, coastal facilities), specify a stainless sleeve to match the fixture. A cast iron sleeve will eventually pit and create a path for moisture intrusion behind the fixture face.
Resources and Internal References
Before finalizing your rough-in drawings, cross-reference the Correctional Plumbing Fixtures Specification Checklist to ensure the bid documents capture every component: flush valve type, carrier type, wall sleeve gauge, and anti-ligature hardware. If water conservation requirements apply to your project, the Low-Flush Stainless Steel Toilets for Detention Centers guide covers how 1.28 GPF systems affect rough-in geometry and flush valve selection.
Getting the rough-in right on a jail toilet installation means reading the submittal drawings instead of relying on memory from previous jobs, building in enough chase space for the plumber who will maintain these fixtures over the next three decades, and communicating wall thickness and outlet position requirements to the manufacturer before the order is placed. The dimensions in this guide reflect standard practice, but every project has variables. Treat the manufacturer’s rough-in drawing as the governing document, and get any deviations confirmed in writing before the concrete is poured.